

3d Printable Fusion 360 Designs
Once a Fusion 360 model is finished, it is time to get it 3D printed. However, the finished 3D model cannot print as-is. A 3D printer (or CNC Machine) needs a toolpath or "instructions" to create the model. Instructions are typically in the form of a G-code (.gcode) file. A 3D Printer's "slicer" must be used to convert the STL file to G-code. Here are three ways to get your 3D model from Fusion 360 and retrieve G-code.
Save As Mesh
Saving an STL (Standard Tessellation Language) file from Fusion 360 is one of the easiest ways to transfer models from Fusion 360 to a 3D printing slicer. This format uses a series of linked triangles to recreate the surface geometry of the 3D model. Use STL files because they are small in size and easy to transfer to 3D machines and software. STL files can also be uploaded and shared with others via online sites like Thangs and Thingiverse.
Exporting STL from Fusion 360
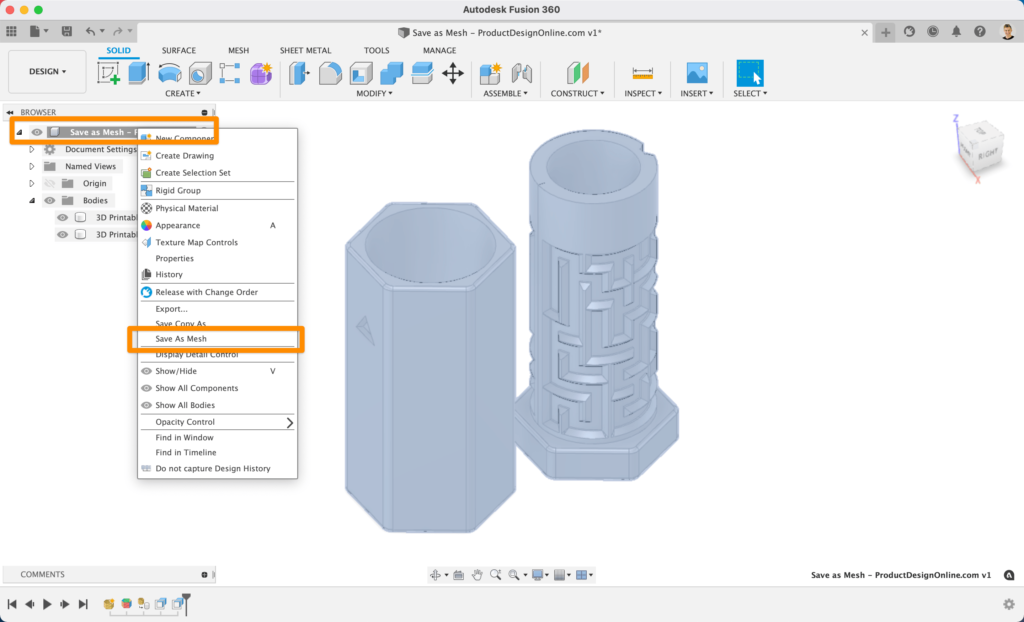
In Fusion 360, right-click on the root (top-level) component, a component, or a 3D body in the Fusion 360 Browser.
Then, select "Save as Mesh" from the right-click menu. This opens the Save as Mesh Fusion 360 dialog, where we can define the export settings.
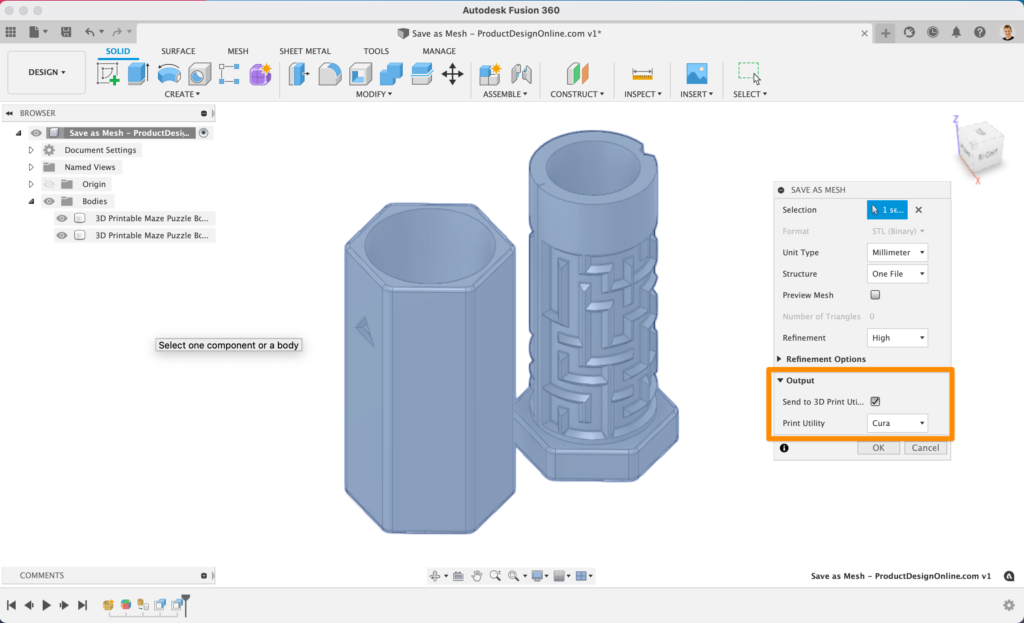
Format: We recommend 3MF files over STL files because they include units of measure and some additional metadata.
The Binary option is recommended if you prefer STL files, as it creates a smaller file that is easier to use, share, and store. Both Binary and ASCII will use the same number of triangles and quality, so the smaller file is preferable.
3D Printing: STL files are unitless, so it's critical to know what unit of measurement the Slicer of software program will expect. See Why is STL 10 times larger than expected.
Structure: If you are printing a model which is already arranged per the print, then the structure should be set to one file. If the model will be arranged as individual parts, then One File per Body will save each body as an individual STL, saving some time by creating multiple files.
Refinement: If the model contains organic shapes and many curves, then a higher refinement may be required, which will increase the number of triangles saved in the STL. This gives the STL higher resolution but increases the file size.
After defining the settings, select OK to save the mesh file.
Importing STL to a Slicer Software
Many 3D printing companies have software that they recommend when using their 3D printers, such as Cura or Prusa Slicer. In addition, slicers often include templates for common makes and models of 3D printers.
After opening your chosen Slicer, click on the import button (or go to File > Import) and select the STL file from your computer.
Select Slice – note that some slicers automatically do this.
Then save the G-code to your computer or an SD card, depending on your printer's setup.
Send to Print Utility
If you would like to 3D print immediately – it is possible to skip the STL export by sending it straight to your chosen slicer.
Select Tools in the toolbar (of the Design Workspace), select Make, then 3D Print. The 3D Print feature will open the same dialog as Save as Mesh.
Check the "Send to 3D Print Utility" in the 3D Print/Save as Mesh dialog. Note that the first time you will be required to select the Application from your computer's folders.
Once you select OK, Fusion 360 will open the Slicer with the part in the print bed. Double-check that your settings are correct before slicing and saving the G-code.
Slice Directly in Fusion 360
Fusion 360 is a CAD/CAM package that helps you quickly go from design to manufacturing. It's no surprise that they also allow users to set up additive manufacturing files for 3D printing directly in Fusion 360.
This workflow allows users to get the G-code file without the use of external slicers.
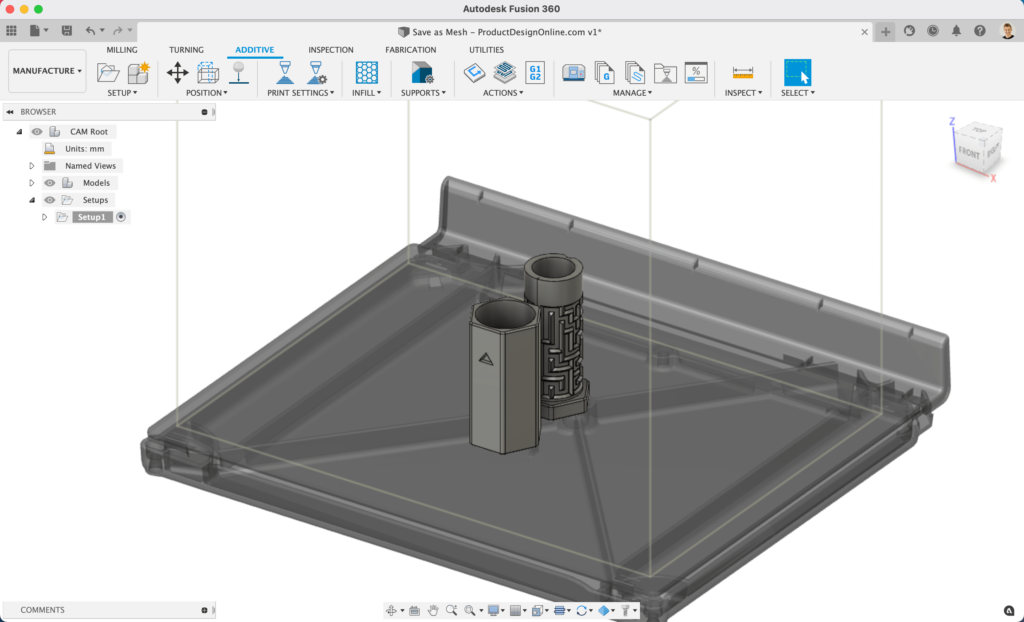
Start by switching to the Manufacture workspace. Select the workspaces dropdown in the upper-left, followed by selecting Manufacture.
Select the Additive tab in the toolbar. Then, select the Setup feature, which opens the Setup dialog.
Machine: Select the 3D printer to be used.
Print Settings: Fusion 360 offers preset settings for each printer. If you don't find your machine (3D Printer) you can create a custom machine.
Setup: For Operation Type select Additive.
Arrangement: Automatic should be checked.
Model: Select the bodies that are going to be 3D printed.
Select OK.
A new setup has then been created. Right-click on the Additive Toolpath and click generate. There will be a bit of loading, and then you will be able to see how the model is being sliced by selecting Simulate Additive Toolpath.
After defining your print settings, select "Post Process," then Post. This will allow you to save the G-code to your computer.
Here is an in-depth step-by-step tutorial on Slicing directly in Fusion 360: https://www.youtube.com/watch?v=E6hFaC6dDlM
Save as Mesh (STL) Summary
STL files are the most common file for 3D printing due to their file size and wide acceptance from 3D printer slicers. STL files are small in size and a storage-friendly way to transfer models between different users.
In Fusion 360, sending your model to 3D Print Utility is a quick way to send the 3D model to a slicer without the need to export an STL file. This streamlines the workflow and prevents clutter in your computer storage.
Using Fusion 360's built-in slicer is a great way to maximize efficiency, allowing you to automatically update toolpaths after making critical design updates.
3d Printable Fusion 360 Designs
Source: https://productdesignonline.com/tips-and-tricks/how-to-3d-print-from-fusion-360/
Posted by: anthonyseellive.blogspot.com
0 Response to "3d Printable Fusion 360 Designs"
Post a Comment